Showing posts with label Healthy Recipes. Show all posts
August 11, 2020

Healthy Pizza Recipe

by , in

Homemade healthy pizza recipe. If you also feel that all diets should include pizza this healthy pizza recipe is perfect for you!

ragi pizza recipe

This healthy pizza crust is thin, pizza dough is made with healthy millet flour,  loaded with yummy healthy pizza toppings pizza sauce, veggies, herbs and cheese. I am also sharing my tips and more healthy pizza ideas in the later part of recipe.

It is simple and easy to make. You need very few ingredients. You can make it in a microwave oven, Yes! This is another heart-healthy recipe I created in collaboration with LG healthy-heart Microwave ovens.

ragi pizza crust

Ingredients for Pizza

 To make the healthy pizza base at home, I have used a healthier low GI flour. I used  finger millet flour, but you can make same base using 00 whole wheat flour alone. In India finger millet flour is known as Ragi or nachni and is extremely healthy. Even diabetics can have this as this is a lower GI flour.    

Flours – Ragi millet Flour,  All purpose flour
Dry Ingredients – Salt, Instant yeast, Sugar
Vegetables– Capsicum (Yellow, red, green), Zucchini (sliced), Corn
Homemade Pizza sauce
Olive oil
Warm water

What is Ragi Flour/ Finger Millet Flour?

Ragi in English is known as finger millet. The flour made out of finger millet is known as finger millet. Its one of very healthy flour to use in everyday cooking. Even this finger millet pizza is quite healthy if you are looking to make multigrain pizza crust.

It is said to help in weight Loss as a part of healthy balanced meal. It contains a good amount of fibre, good source of protein and amino acids. It is great to use in everyday diet.

How to Make This Healthy Pizza

Since I am making this healthy pizza everything is made from scratch. From pizza base, to pizza sauce and toppings everything makes this homemade pizza very healthy. 

Healthy Pizza Dough

To make this healthy homemade pizza, first you need to make pizza dough. For making the dough you need to mix the following ingredients. 

Ragi Pizza dough for ragi crust step by step

Sift together ragi millet flour, all purpose flour, salt and sugar. Next, add in instant yeast, mix. [photos 1,2,3,4,5,6]

making of ragi pizza base step by step.jpg

Next step is to knead to form a soft dough. Place in water and cover with a Muslim cloth and set aside to rise. [photos 1,2,3]

Once the dough gets doubled in size. Your healthy pizza dough is ready.

To Make Thin Crust Pizza

When pizza dough has risen to double from the start Knock it and flatten it to form a big thin round crust. Spread homemade pizza sauce. I have shared homemade pizza sauce recipe before. [photos 4,5,6]

Making ragi pizza in microwave

Add 1/2 amount of cheese vegetables and finally remaining cheese. Place it on greased microwave safe plate tava. [photos 1,2]

From Healthy heart menu and then select menu number -15 to preheat. Once it beeps Place in pizza plate on lower rack and press start. [photos 3,4]

After the beep, shift The pizza plate on high rack and press start again till it finishes cooking. [photos 5,6]

thin crust ragi pizza topped with goat cheese

Watch Video

For more clarity on texture and exact recipe looks at various stages of making this healthier pizza recipe in microwave I strongly recommend watching video below.

How to Make it in Oven

If you do not own microwave oven with the above options you can make this healthy pizza in your regular oven. Here’s how to make it.

When your pizza dough is ready, put your oven to pre-heat at 220C or 430F for 10 minutes. Now roll the pizza dough and place toppings. 

After placing all the toppings and cheese, place pizza plate in the oven and bake this pizza for about 20 minutes on 200C or 395F. 

Recipe Notes and Tips

  • Ragi flour/millet flour takes time to cook. Thick pizza base does not work well for this ragi pizza recipe. Roll the pizza crust thin. 
  • You can use your favorite veggie recipes instead of the ones I have used in this recipe.

Healthy Pizza Toppings

There is a great choice when it comes to healthy pizza toppings. Few of our favourite toppings for pizza are:

Vegetable toppings like mushrooms, baby corns, shaved carrots, thinly sliced zucchini are good options for topping vegetable pizza.

When you are craving proteins, you can use tofu, paneer, halloumi cheese, goat cheese (after baking pizza). If you eat eggs, adding eggs 4-5 minutes before pizza finishes baking is a good option as well.

Other Microwave Recipes to Try

If you like the recipe, please leave a comment and Rating for the recipe. Do share the good food, recipes and good vibes with your friends and family on Facebook Instagram , WhatsApp or twitter :).

You can Subscribe to Our WhatsApp Recipe broadcast for Free by messaging Subscribe on  +91-8368756817

Healthy pizza in microwave
Print

Ragi Pizza – Healthy Pizza in Microwave

A healthier pizza recipe with Ragi crust. With a generous topping of homemade pizza sauce, vegetables and cheese, this Ragi pizza is a healthier treat for adults and kids alike. You can even pack this pizza for kids lunch box.
Course Appetizer, lunch, Snack
Prep Time 10 minutes
Cook Time 20 minutes
resting time 45 minutes
Servings 6
Calories 117kcal

Equipment

  • microwave

Ingredients

  • 1/2 cup Ragi Flour
  • 1/2 cup Maida
  • 1 tbsp olive Oil
  • Salt
  • 7 gm Instant yeast
  • 1 tsp Sugar
  • 1 cup Capsicum Yellow, red, green
  • Homemade Pizza sauce
  • 1/2 Zucchini sliced
  • 2 tbsp Corn

Instructions

  • In a mixing bowl sift together maida ragi flour salt and sugar
  • In the bowl add instant yeast, mix and knead to a soft dough. Place in water and cover with a Muslim cloth and set aside to prove.
  • Once proved knock it back. On a work surface, dust it with white flour and spread it in square shape.
  • Spread pizza sauce, 1/2 amount of cheese vegetables and finally remaining cheese
  • Place it on greased tava.
  • *On Microwave*
  • Press Healthy heart menu and then select menu number -15 to preheat once it beeps
  • Place pizza on tava on the lower rack press start
  • After the beep, shift tava on high rack and press start again

Video

Nutrition

Calories: 117kcal | Carbohydrates: 19g | Protein: 3g | Fat: 3g | Saturated Fat: 1g | Sodium: 4mg | Potassium: 150mg | Fiber: 2g | Sugar: 3g | Vitamin A: 823IU | Vitamin C: 35mg | Calcium: 4mg | Iron: 1mg

More Healthy Finger Millet Recipes

The post Healthy Pizza Recipe appeared first on My Tasty Curry.


from My Tasty Curry https://ift.tt/2XObmvM
via IFTTT
August 06, 2020

Beetroot, apple and ginger juice

by , in
Beetroot, apple and ginger juice

Try our beetroot juice then make our vegetable smoothie. Check out more beetroot recipes.

  • 187
  • Total time 10 minutes
  • Difficulty Easy

Ingredients

  • beetroots 200g, peeled and quartered
  • eating apples 2, quartered
  • ginger 2 x thumb-sized pieces

Method

  • Step 1

    Push the beetroots, apples and ginger through a juicer, or alternatively, chop the beetroot and apple, and whizz in batches with 300-350ml of water in a high-powered blender until completely smooth, then strain through a fine sieve, really pushing it through. Pour into two glasses filled with ice.

*This recipe is gluten free according to industry standards


Head here for more juice inspiration

[image id="91626" size="landscape_thumbnail" align="none" title="Lime Juice Cordial Recipe and Strawberry Cordial Recipe" alt="Lime Juice Cordial Recipe with Cucumber" classes=""]

Nutritional data

  • kcals 74
  • fat 0.5g
  • saturates 0.1g
  • carbs 14g
  • sugars 13.3g
  • fibre 3.1g
  • protein 2g
  • salt 2g


from olivemagazine https://ift.tt/33x9uLy
via IFTTT
August 06, 2020

Quinoa chicken salad

by , in
Quinoa chicken salad

Try our quinoa salad then check out our vegan quinoa chilli and more quinoa recipes.

  • 187
  • Total time 40 minutes
  • Difficulty Easy

Ingredients

  • quinoa 75g
  • chicken breasts 2 small
  • vegetable oil 2 tsp
  • ground cumin 2 tsp
  • ground coriander 2 tsp
  • red onion 1, chopped
  • cucumber ½, chopped
  • plum tomatoes 2, finely chopped
  • mint a handful of leaves, shredded, plus a few leaves to serve
  • extra-virgin olive oil 1 tbsp
  • sumac 2 tsp
  • lemon 1, zested and juiced

Method

  • Step 1

    Cook the quinoa in a pan of lightly salted boiling water following pack instructions, then drain really well.

    Step 2

    Put the chicken breasts between two pieces of baking paper and use a rolling pin to gently tap out until less than 1cm thick. Drizzle over the oil, season well and dust with the cumin and coriander, turning to coat.

    Step 3

    Heat a large non-stick frying pan until medium-hot then cook the chicken breasts for 5-6 minutes on each side or until golden, charred and cooked through. Move onto a plate to rest for 2-3 minutes, then slice.

    Step 4

    Mix the onion, cucumber, tomatoes and mint with the olive oil, 1 tsp of sumac, the lemon juice and some seasoning, and mix really well, then fold in the sliced chicken, any juices and the cooked quinoa.

    Step 5

    Pile onto plates and top with the remaining sumac and more mint leaves, if you like.

*This recipe is gluten free according to industry standards


Check out our best healthy chicken recipes

[image id="109743" size="landscape_thumbnail" align="none" title="Cumin, orange and paprika chicken" alt="Cumin, orange and paprika chicken" classes=""]

Nutritional data

  • kcals 431
  • fat 14.2g
  • saturates 1.9g
  • carbs 32g
  • sugars 9.7g
  • fibre 7g
  • protein 40.1g
  • salt 0.2g


from olivemagazine https://ift.tt/2Dqqk49
via IFTTT
August 05, 2020

Stovetop Coconut Caramel Custard

by , in

Here’s a vegan version of the decadent coconut caramel custard. A twist on the classic caramel custard, this recipe is eggless, dairy-free and so easy to whip up!

I love caramel custard! But I’m not a big fan of that eggy aftertaste that can remain sometimes if its not made well. So I came up with a 100% vegan caramel custard recipe. It turned out so rich and creamy, sets well, and doesn’t have that aftertaste! I’d say this is my newfound love in eggless recipes. Second only to the Intense Eggless Chocolate Mousse of course! Nothing beats that.
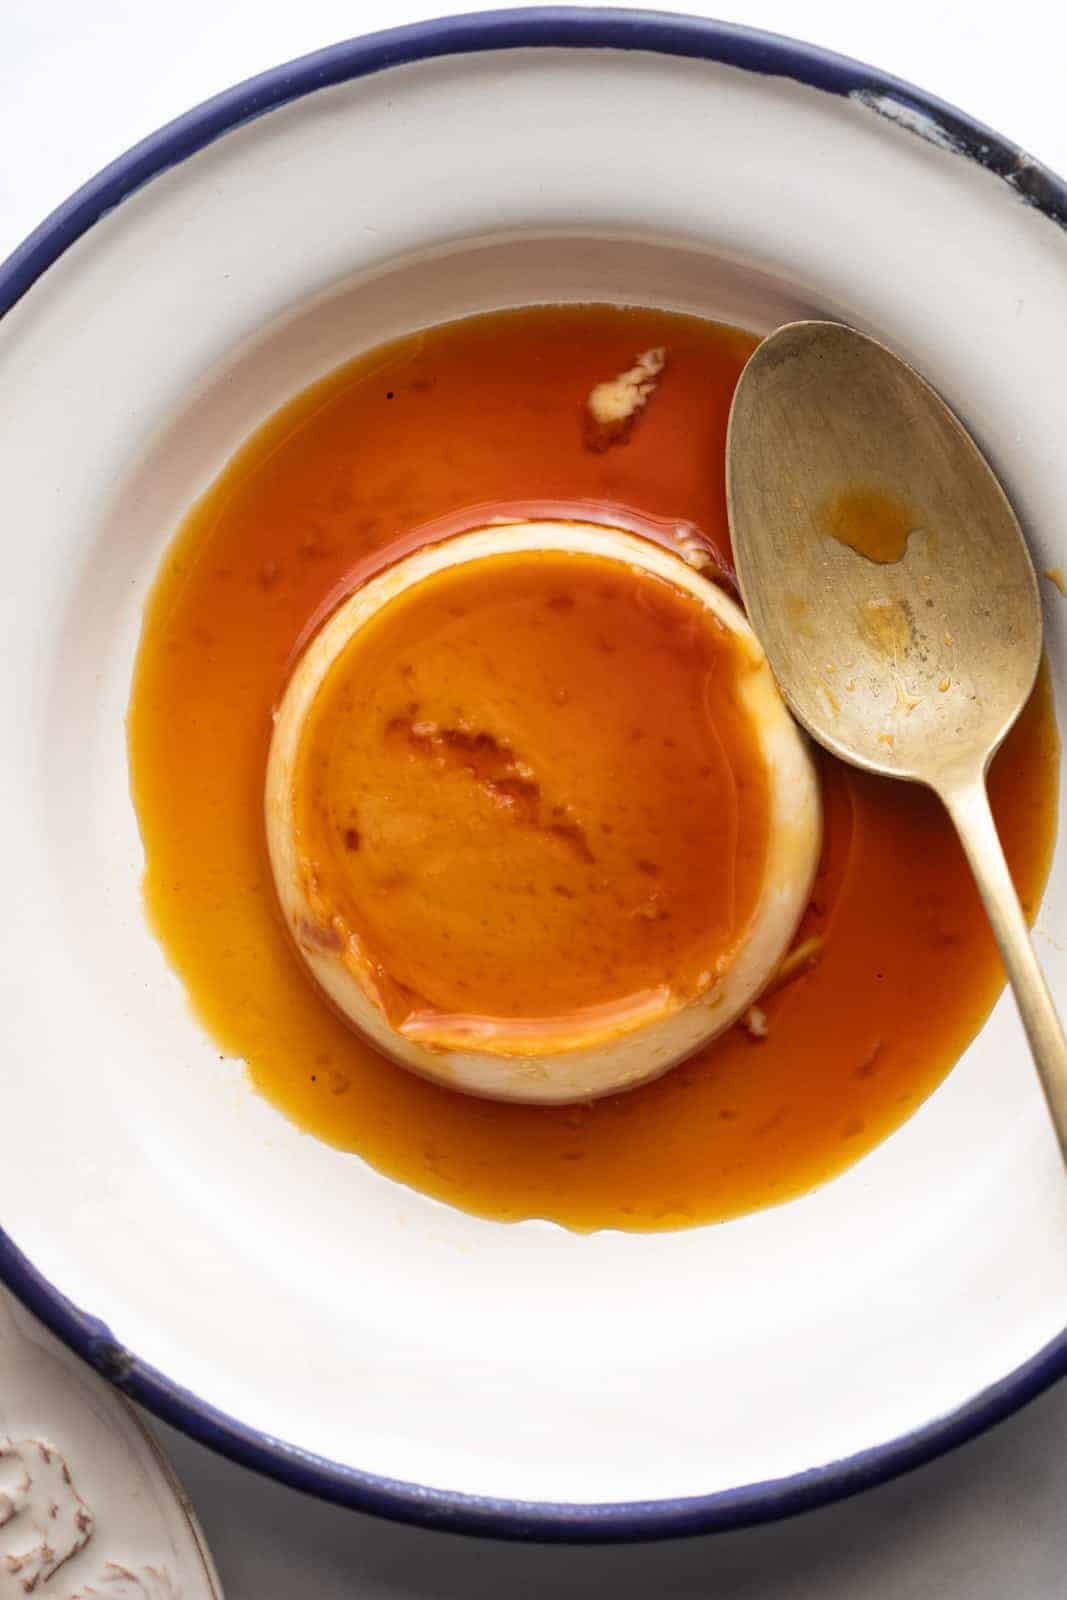
Closeup of coconut caramel custard served on a white plate with a blue edging and a spoon

How to Veganize Caramel Custard

I substituted the dairy with freshly extracted coconut milk. Coconut milk, apart from tasting amazing, is also super healthy and light on the tummy. The coconutty flavour comes through in the custard, and it is GOOOOOD. Add a few drops of vanilla extract to the coconut milk, and it’s perfect. Cans of coconut milk are also readily available in any Indian supermarkets. If you are worried that the coconut milk will split on heating, the key is to keep it on a low flame and stir continuously till the custard thickens.

The Thickener

Traditionally, it’s the eggs in caramel custard that act as the main thickener. But they also leave an undesired after-taste. So I simply substituted it with the next best thickening agent – cornflour! Mix the cornflour in along with the coconut milk and whisk it well so there are no lumps. Don’t worry, this eggless caramel custard will not compromise on the texture of the custard! And since cornflour has no distinct taste, problem solved!
Closeup of the texture of coconut caramel custard after taking a bite

The Burnt Sugar or Caramel

For the caramel in this recipe, I like using refined granulated sugar. You can also choose other sweeteners like jaggery, coconut sugar or palm sugar. The sugar is heated on a low flame, and stirred continuously so that there are no clumps. You’ll see it start to melt around the edges first. It’s important to watch this closely as caramel can go from dark to burnt in seconds – that’s a little harder to tell if you are using anything apart from granulated white sugar. The idea is to caramelise it and take it just a little far so that there is a sweet bitter flavour, but not take it so far that it gets burnt and inedible. Pour the hot syrup onto the base of the ramekins and allow it to cool for 2 to 3 minutes before pouring in the coconut custard. This dish is all about simplicity. And there are so many simple ways to pack in flavours. Don’t forget to add a pinch of salt, it brings life into the dish like nothing else would! A few drops of vanilla extract go a long way. Next time, I plan to add a little bit of desiccated coconut in the mixture for some extra texture and taste. Garnishes can range from berries to coconut shavings to chopped dry fruits!

Top Tips for perfect Coconut Caramel Custard

Here are some extra tips to get that perfect creamy and light coconut caramel custard:
  • Pour warm coconut custard into the ramekins. This heats up the cooled caramel so that when you unmold the caramel custard, you’ll be rewarded with sweet, syrupy caramel as topping
  • If your coconut custard cools down completely and looks lumpy, just bring it back to flame, heat it gently and keep whisking till it’s lump free. You can also add a splash of milk or coconut milk while you do this. Just a tablespoon or two is enough.
  • Pour the caramel into moulds immediately. Caramel cools down really fast, and as it cools, it’ll thicken and become stringy, which will make it near impossible to pour it.
  • I would recommend a minimum of 6 to 8 hours in the fridge. This way the custard is set perfectly and when you flip it, that glorious caramel will melt all over the caramel custard!
  • To demold, just run a knife around the edges to loosen it slightly. There is no need to place it in warm water.
Overhead picture of two plates with coconut caramel custard ready to be served
So there you have it, my foolproof vegan caramel custard without compromising on taste or texture! This recipe is such a stunner. Looks fantastic on the table, especially that aha moment when you demould it and all the caramel comes pouring around the sides. And its lighter on the tummy. Plus that coconut flavour will transport you to the beaches! I promise.

Watch Coconut Caramel Custard Recipe Video

Overhead picture of coconut caramel custard served on a white plate with a blue edging and a spoon
Print

Vegan Coconut Caramel Custard

A delicious recipe for coconut caramel custard that's vegan and made on the stovetop in a steamer. It's a stunning dessert that's light and creamy.
Course Desserts
Cuisine Indian
Keyword caramel custard, coconut caramel custard, easy desserts, no bake
Prep Time 10 minutes
Cook Time 40 minutes
Total Time 50 minutes
Servings 6 Portions
Calories 166kcal
Author Richa

Equipment

  • 6 small Ramekins

Ingredients

Custard

  • 200 ml Coconut Milk thick (see note 1)
  • 3 tablespoons Sugar
  • 2 tablespoons Cornflour
  • 1 1/2 teaspoons Vanilla Extract

Caramel

  • 1/2 cup Sugar

Instructions

  • Whisk together all the ingredients under custard in a saucepan till smooth and lump free. Place the saucepan on heat and keep whisking till the mixture thickens - approx 4 minutes. Set aside.
  • Take another saucepan and add sugar in it. Place it on a medium heat and wait till the sugar starts to melt around the edges (watch the video above). Use a spatula to stir it around. It'll look clumpy at first but will become smooth as the sugar melts. Continue to cook the sugar, stirring till the colour changes to a dark amber. The change in colour happens very quickly so pay close attention (no Instagram please!). Remove from the flame and divide between ramekins (about 1 1/2 tbsp between each ramekin) making sure that caramel coats the bottom of the ramekins completely. Let this cool for 2-3 minutes until just set.
  • Pour warm custard over the cooled caramel in ramekins. At this point, if the custard has cooled and looks lumpy, quickly place it back on heat to warm it, and keep whisking to get rid of any lumps. Cover the ramekins with aluminium foil.
  • Bring 2 cups of water to boil in a steamer. Once the water starts boiling, reduce the heat and place ramekins in a steamer basket or a rack. Close the steamer and steam on low heat for 15 minutes. Then turn off the flame and let the ramekins sit in the steamer for another 20 minutes.
  • Bring the ramekins to room temperature, take off the foil and refrigerate for 6-8 hours.
  • To unmold, run a knife around the edges of the custard and invert it over a serving dish. Enjoy!

Video

Notes

  1. Coconut Milk: I prefer store bought coconut milk that's available in tetra packs or cans for this recipe, since they are more stable and less prone to splitting
  2. Storage: These are best enjoyed the same day, or the next day. Any longer in the fridge and they start to dry slightly

Nutrition

Calories: 166kcal | Carbohydrates: 26g | Protein: 1g | Fat: 7g | Saturated Fat: 6g | Sodium: 5mg | Potassium: 73mg | Sugar: 23g | Vitamin C: 1mg | Calcium: 6mg | Iron: 1mg

The post Stovetop Coconut Caramel Custard appeared first on My Food Story.


from My Food Story https://ift.tt/2Xw04fx
via IFTTT
August 05, 2020

Bicicletta spritz

by , in
Bicicletta spritz

Try our bicicletta spritz then check out our negroni recipe, Aperol spritz and more summer cocktail recipes.

  • 499
  • Total time 5 minutes
  • Difficulty Easy

Ingredients

  • orange 1, cut into wheels
  • dry white wine (a light Italian variety such as pinot grigio or gavi) 3 tbsp
  • Campari 3 tbsp
  • soda water

Method

  • Step 1

    For each drink, fill a glass with ice and an orange wheel. Add the wine and Campari, stir, then top up with a splash of soda.

Fancy another cocktail?

[image id="103909" size="landscape_thumbnail" align="none" title="White Russian Recipe" alt="White Russian Recipe" classes=""]


from olivemagazine https://ift.tt/33viXmO
via IFTTT
August 05, 2020

Halloumi and watermelon salad

by , in
Halloumi and watermelon salad

Try our halloumi and watermelon salad recipe then check out our watermelon and feta salad or our BBQ side dishes for summer.

  • 78
  • Total time 20 minutes
  • Difficulty Easy

Ingredients

  • watermelon 500g, peeled and cut into thin wedges
  • white balsamic 2 tbsp
  • olive oil 2 tbsp
  • red chilli 1, finely chopped
  • halloumi 2 x 250g packs, thinly sliced
  • mint a handful of leaves, shredded

Method

  • Step 1

    Put the watermelon in a large dish. Whisk the white balsamic and olive oil with a little sea salt, then stir in the chilli. Pour over the watermelon, toss and leave to sit for 15 minutes.

    Step 2

    Heat a non-stick pan then dry-fry the halloumi on each side until golden.

    Step 3

    Layer up the watermelon and halloumi on a platter then pour over any dressing that’s left in the watermelon marinating dish. Scatter over the mint and serve.

*This recipe is gluten free according to industry standards


Check out our best halloumi recipes

[image id="106935" size="landscape_thumbnail" align="none" title="Hasselback Halloumi Bake Recipe" alt="Hasselback halloumi traybake" classes=""]

Nutritional data

  • kcals 243
  • fat 17.6g
  • saturates 10.8g
  • carbs 6.2g
  • sugars 6.1g
  • fibre 0.1g
  • protein 15g
  • salt 1.9g


from olivemagazine https://ift.tt/3gqOk5o
via IFTTT
August 05, 2020

Easy Egg Muffins

by , in

Egg Muffins are one of the most versatile breakfast recipes. You can never go wrong, and you can create a number of variations. Super easy and a big batch can be ready in 30 minutes!

If you love make ahead breakfast recipes, try our freezer friendly potato veggie frittata, chocolate chip zucchini muffins, easy granola bars and breakfast burritos.

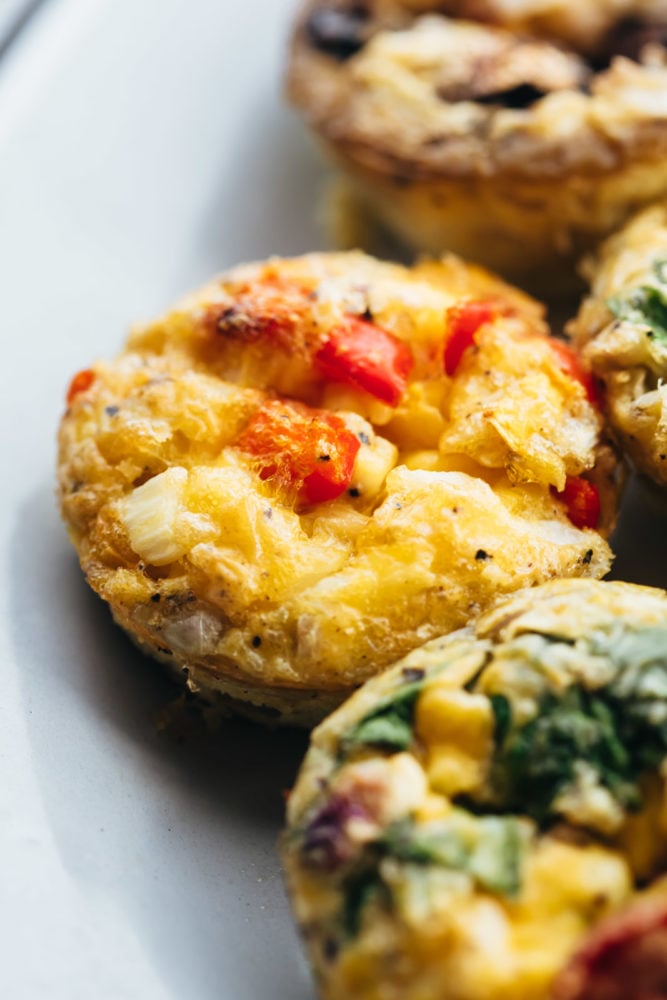
Closeup of baked egg muffins

Easy Baked Egg Muffins

Whether you have a big family to feed or its just the two of you, these egg muffins can forever come to your rescue. They are a great make-ahead breakfast that can be prepped quickly. You can make these ahead with lots of different variations, so a repeat breakfast during the week doesn’t feel boring or freeze them for later! They are so fun to eat because you can just grab and go. And nutritious, healthy and super tasty. It doesn’t get better than this!

These muffins are absolutely delicious! And they can really feed a hungry crowd! Plus everyone can pick their favourite toppings and make their own favourite egg muffins. Which for me is a win-win!

Toppings:

Start with prepping all your ingredients. This is probably the most time consuming part of the recipe, but if you buy pre-cut veggies at the supermarket, this becomes easy peasy. Or better still, get the family together to help you. These are just some ideas. Feel free to go wild and pick what you like!

Here are a bunch of add-ins to choose from:

  • Tomatoes
  • Mushrooms
  • Jalapenos
  • Bell Peppers
  • Spinach
  • Bacon
  • Ham
  • Zucchini
  • Basil
  • Cheeses Like Cheddar, Feta Or Goats Cheese

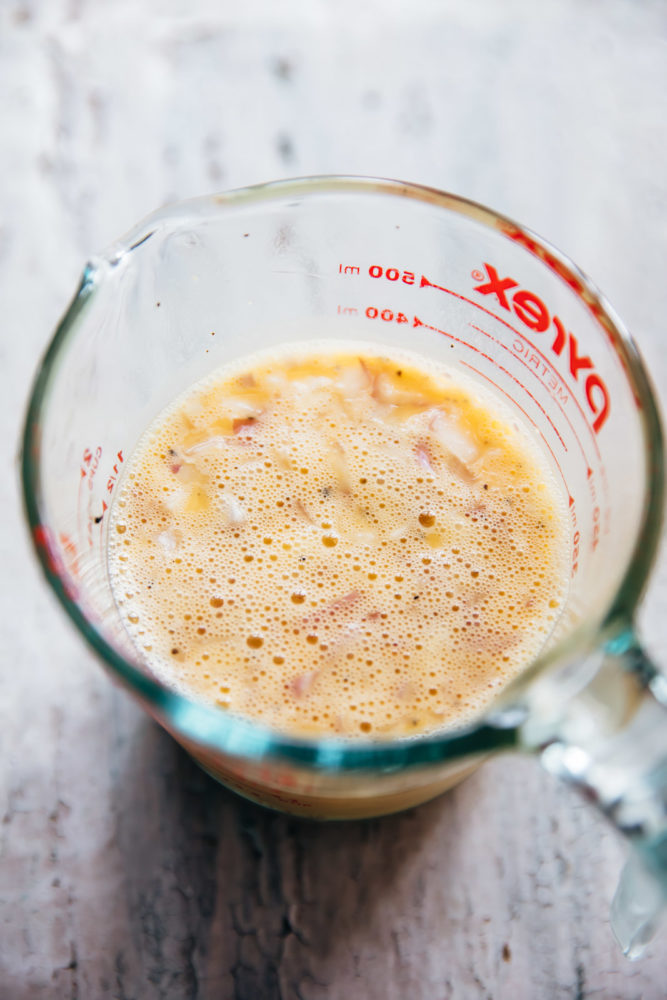
Make the egg mixture next. I like to whisk together eggs, cream, finely chopped onions, salt and pepper. This forms the base and goes with anything you decide to add in your egg muffins.

Egg mixture for egg muffins

Assemble:

  1. Assembling these is really easy. Take a 6 hole or 12 hole muffin tray and spray it generously with oil or butter, add your toppings and fill it up with the egg mixture.
  2. Bake for 20-25 minutes and this is ready!
  3. You can choose to line the tray with paper liners, but if you spray the tin generously, the muffins just come out easily.
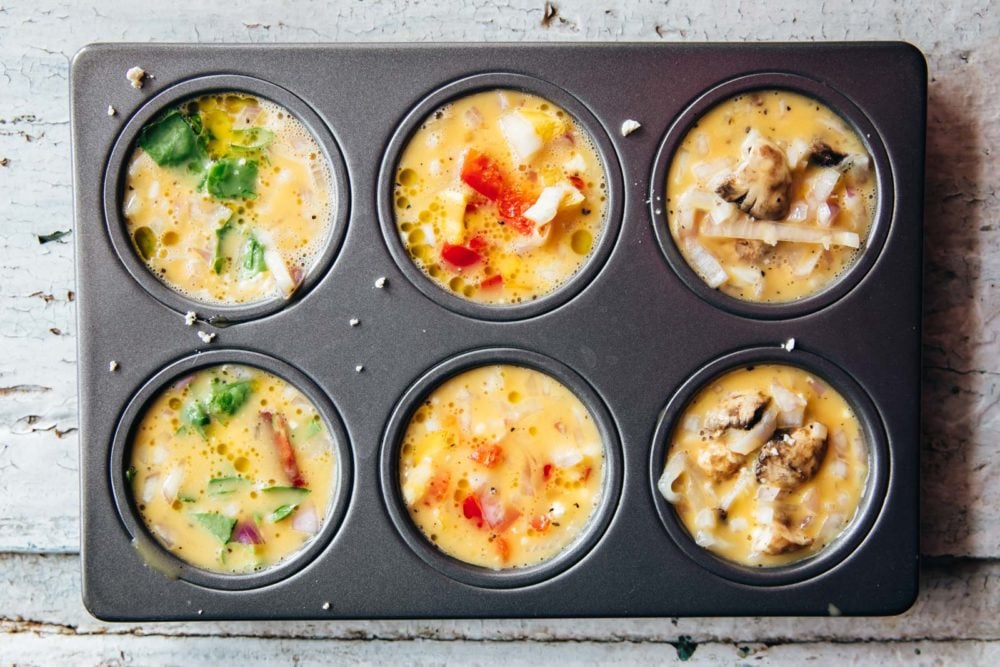
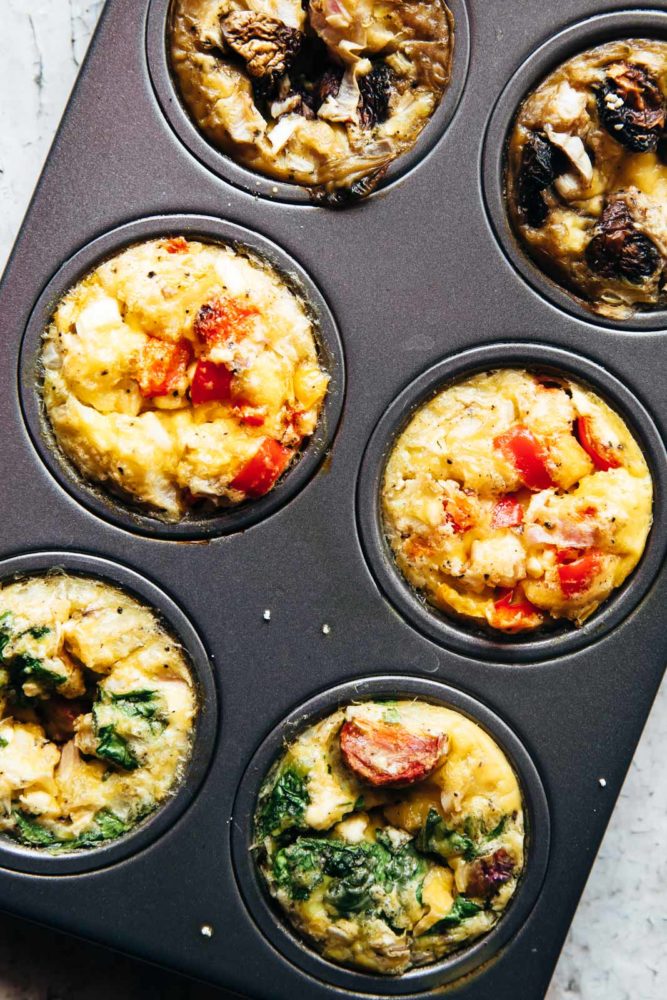
  4. In the pictures, you’ll see that I’ve used mushrooms, spinach and cherry tomatoes and bell peppers for three different combinations. And feta of course!

Egg muffin mixture ready to be baked

Storing Eggs Muffins:

  • Storage: Store these in an airtight container in the fridge for up to 4 days, or wrap them individually and freeze in a ziplock bag for up to 3 months
  • Reheat: To reheat, microwave for 30 secs to a minute till the center is warmed through.

Baked egg muffins in the muffin tray

More Favorite Breakfast Recipes:

Closeup of baked egg muffins
Print

Easy Egg Muffins

Egg Muffins are one of the most versatile breakfast recipes. You can never go wrong, and you can create a number of variations. Super easy and a big batch can be ready in 30 minutes!
Course Breakfast
Cuisine American
Keyword easy egg muffins, egg muffins, egg muffins recipe
Prep Time 15 minutes
Cook Time 20 minutes
Total Time 35 minutes
Servings 6 people
Calories 251kcal
Author Richa Gupta

Ingredients

  • 12 Eggs
  • 4 tablespoons Cream
  • 1 Onion finely chopped
  • 1 1/4 teaspoon Salt
  • 1 teaspoon ground Black Pepper
  • 1/2 cup sliced Mushrooms
  • 1/2 cup Bell Pepper diced
  • 1/2 cup Cherry Tomatoes
  • 1/2 cup Spinach chopped
  • 1/2 cup crumbled Feta
  • 2 tablespoons Oil for brushing or spraying

Instructions

  • Preheat oven to 350 degrees
  • Whisk together eggs, cream, onions, salt and pepper in a pourable jar
  • Generously spray or brush a 12 hole standard sized muffin tin with oil or butter
  • Divide the toppings between the muffin holes. You can choose to divide them whichever way you like. Divide the egg mixture equally in the muffin tin
  • Bake for 20-25 minutes till a toothpick inserted in the center comes clean. Serve immediately or freeze!

Notes

  • Storage: Store these in an airtight container in the fridge for up to 4 days, or wrap them individually and freeze in a ziplock bag for up to 3 months
  • Reheat: To reheat, microwave for 30 secs to a minute till the center is warmed through

Nutrition

Calories: 251kcal | Carbohydrates: 5g | Protein: 14g | Fat: 20g | Saturated Fat: 8g | Cholesterol: 352mg | Sodium: 758mg | Potassium: 256mg | Fiber: 1g | Sugar: 3g | Vitamin A: 1359IU | Vitamin C: 21mg | Calcium: 124mg | Iron: 2mg


from The Recipe Critic https://ift.tt/2PsaQ20
via IFTTT